
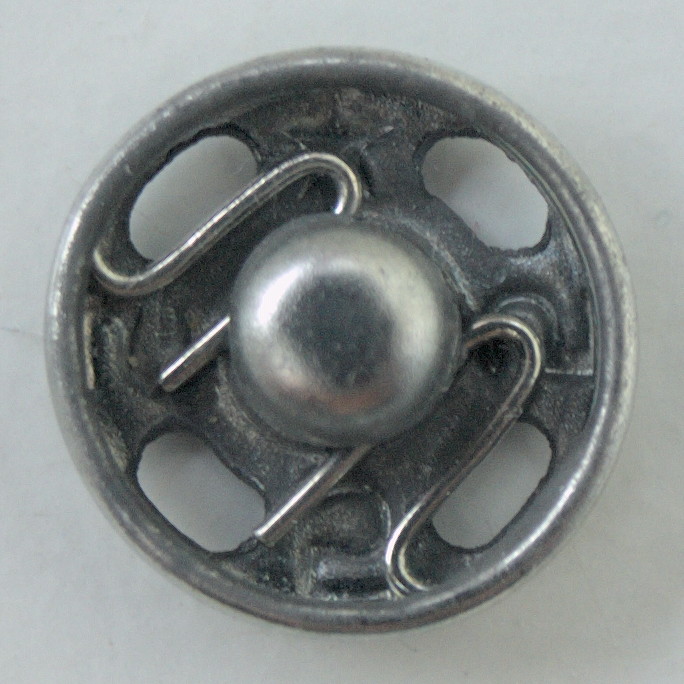
Photo: Simulo. CC0 1.0 · Original source. Unmodified for this article. The photograph remains under its stated license; no endorsement, specific material grade or JKPD use is implied.

01
Identify the attachment method first
A sew-on snap attaches through openings around its edge. It is a different installation route from a press-set fastener that requires dedicated setting tools. Identify that route before comparing diameter, finish and opening feel. A front-view reference photograph is an incomplete request for a matching component.
This review focuses on light organizers and internal pocket flaps. Suitability depends on the application and validation; a clothing accessory is not automatically a loaded outdoor connection. Describe one-handed opening, concealed attachment and repair access as separate requirements when relevant. Combining them all under a request for a strong snap makes tradeoffs difficult to assess.
02
Separate the spring interface from the sewing interface
Prym’s sew-on snap information describes a spring section, a stud and peripheral openings for sewing. This provides a useful distinction: the engagement between the two halves and the attachment of each half to fabric are separate interfaces. A particular product description does not specify every alternative snap.
The photograph shows the receiving half from the fabric-facing side, exposing its spring and peripheral openings. It does not show a complete paired assembly or a sewn installation. Request paired article references and photographs of both faces. Confirm sewing access with the intended needle and thread, keeping stitches clear of the moving mechanism.
Simulo · CC0 1.0 · Source · Unmodified. External object, not a JKPD product.
03
Locate halves in the natural closed position
Let the flap, pocket mouth and lining settle into the intended closed shape before transferring centre positions. Positioning while fabric is stretched can leave puckering, misalignment or persistent opening tension when it relaxes. Check finger access around the closure at the same time.
A removable temporary attachment can support an initial operating review before the final stitch arrangement is confirmed. When the two surfaces sit at different heights, review flap reach, thickness transition and location. Selecting a harder-opening snap to compensate for a pattern mismatch can conceal the original problem and make operation less comfortable.
04
Give the stitches a stable substrate
Stitching into a thin loose lining differs from stitching into a supported flap. Prototype reinforcement area and location in the actual construction, identifying which layers the stitches capture. Do not assume that every layer should be pierced. If stitches must remain invisible outside, provide access at the appropriate assembly stage.
Record thread, needle, stitch arrangement, securing and thread-end treatment. Inspect whether thread passes over a sharp edge, restrains the spring or leaves a knot against the contents. More stitches do not automatically establish a better attachment. Also inspect the local fabric for damage associated with concentrated needle holes.
05
Define how the user opens the closure
Opening close to the snap and pulling from the far edge of a flap place the attachment in different conditions. Include intended grip positions and directions in the sample plan. Observe whether the fabric deforms first, whether attachment stitches are visibly loaded, and whether the halves align naturally during closing.
Compare empty, filled and intended-care states where relevant. Record changes in operation, loose thread, fabric marks and appearance. The project needs to establish cycle counts, opening-force requirements and care conditions using suitable methods. A subjective feel description is not measured performance, and these proposed checks are not a report of completed testing.
06
Keep pairing information for repair and production
Keep the sample and its record together
Check whether a snap can be replaced without damaging the internal pocket, whether stitches and sewing openings remain accessible, and whether repair requires replacing both halves. Do not assume equal-diameter parts from different suppliers are interchangeable, or use similar colour as evidence of compatibility.
The production record should retain paired article references, batch, sewing location and sequence, reinforcement construction, needle and thread details, and the approved sample identifier. A supplier change to spring construction, finish or paired components deserves review even when outside diameter stays the same. Record the reason for any approved substitution rather than allowing an undocumented visual match.
07
Ask about the complete connection
An RFQ should include application, operating requirements, paired components, attachment layers, stitch route and appearance expectations, followed by physical samples. A quotation that gives only a millimetre diameter still lacks important connection information.
Ask whether the assembly is sew-on or press-set, how its sewing openings should be used, how paired parts are identified, and how operation and stitch attachment should be reviewed with your lining and reinforcement. Require answers supported by the proposed sample. This connects component selection to the real pocket or flap and gives the next developer a repeatable basis for review.
Share your application, candidate components and sample requirements through the JKPD project inquiry page.
Discuss your bag development project
ANSON XIE
General Manager & Founder
Quanzhou Junkai Pengda Special Equipment Co., Ltd.
Email: ansonxie@jkpdtime.com
Phone: +86 177 5095 3355
WhatsApp: +86 177 5095 3355
Factory address: Floors 2–4, Building 1, Phase I, Huixin Intelligent Manufacturing Industrial Park, Hui'an County, Quanzhou, Fujian, China